
DIY Website Maintenance: A Practical Guide for WordPress and YOOtheme Pro Builds hosted on WP Engine
Your website should be something you understand and control. If you have the time and interest, you can handle routine maintenance yourself—with a clear plan, a reliable backup and a little patience. The “Update all” button is tempting. It is also a very efficient way to lose track of what changed.
This guide walks through a supervised update routine for a WordPress website using YOOtheme Pro hosted on WP Engine. You can follow it yourself or use the prompts below with an AI agent that has browser access. You stay responsible for approving changes and checking the result.
Prefer to have someone handle the maintenance? You do not need to become a website expert. Explore Poket Marketing’s website maintenance services and find out how we can help care for your WordPress and YOOtheme Pro website.
In this article
- Create a completed backup and rehearse safely on staging.
- Choose the update order using compatibility and vendor requirements.
- Decide between native WordPress auto-updates and manual care.
- Test desktop, mobile, forms and the functions your customers rely on.
- Supervise your AI agent with five copyable prompts and clear stop points.
- Recover carefully without overwriting new orders or inquiries.
Keep this beside you: Download the one-page website maintenance checklist (PDF) to track your backup, staging tests, live updates and follow-up notes.
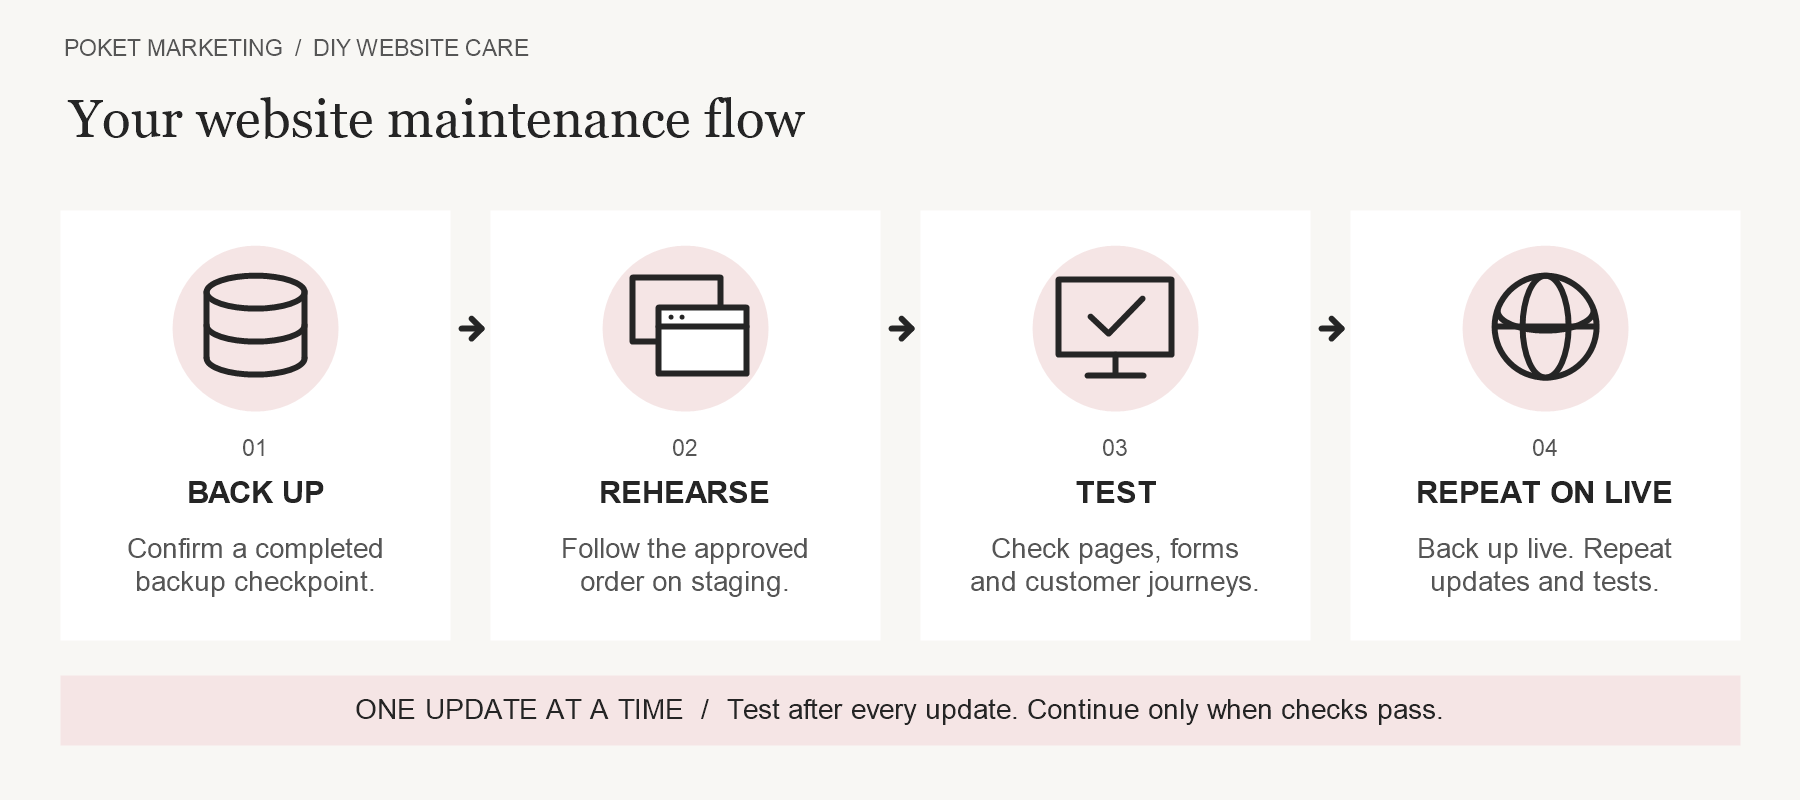
Know which tool does what
- WordPress runs your website. Plugins add functions such as forms, search and booking.
- YOOtheme Pro is your WordPress theme and visual builder. Treat its update as a theme update, not a plugin update.
- WP Engine hosts your site and provides environment and backup tools.
- Production is the live site customers use. Staging is a separate copy where you can rehearse changes.
Before starting, make sure you can identify both environments, access the right accounts and contact your host or developer if something goes wrong. Keep passwords and other credentials out of AI prompts, screenshots and shared notes.
Before you start: open these three tabs
- Your WP Engine hosting account: open my.wpengine.com in Chrome and sign in. This is where your website’s backups and practice copy are managed. The agent can help you find the correct website inside the account.
- Your WordPress dashboard: open your usual website-editing login in a second tab and sign in. If you do not know where it is, tell the agent; it can help locate the WP Admin link in your WP Engine account.
- Your public website: open the address your customers visit in a third tab. This gives you a familiar starting point for checking pages and links.
Keep these tabs in the Chrome browser your AI agent can access. Enter passwords and sign-in codes yourself, directly on the account’s sign-in page. If you get stuck, start the first prompt anyway and say which page you have reached. The agent should help you find the next step. You do not need to find or create the staging copy on your own.
Using the AI prompts: copy each full pink prompt into the same conversation with your browser-capable AI agent, in the order you reach it. Start with the first prompt and let the agent gather the details. You do not need to look up version numbers or backup times. The agent should explain its recommendations, ask for approval when needed and guide you through any step that requires your help. If you start a new conversation, ask it to review the earlier maintenance notes before continuing.
1. Start with a plan and a completed backup
Set aside a quiet maintenance window when you can stay through testing. List the installed WordPress, PHP, theme and plugin versions, the available updates, and the business functions you need to protect. Record how the site behaves now so an existing problem does not get mistaken for a new one.
In the WP Engine User Portal, select the correct environment → Backups → Create backup. Give the checkpoint a clear description, such as “Before September maintenance.” Wait until it is complete and visible in the backup list; record its time and environment. Starting a backup is not the same as having one ready. See WP Engine’s backup instructions.
Copyable AI prompt — help me get ready and make a plan
Help me maintain my WordPress website, built with YOOtheme Pro and hosted on WP Engine. Our goal is a safely updated website that still looks right and lets customers contact me, book or buy as intended, with a completed backup, a record of what we checked and a clear next maintenance date. We will inspect first, try the updates on a separate practice copy, and only then make approved changes to the live website.
Be a patient, encouraging guide for someone who is not comfortable with technical work. Use everyday language, short explanations and one manageable step at a time. Explain unfamiliar words when they first appear. Be warm and respectful, without talking down to me, rushing me or saying something is easy. Tell me what we have accomplished and what comes next; reassure me using facts, not promises that nothing can go wrong.
Start by helping me get the right pages open in Chrome. Guide me to my WP Engine hosting account at my.wpengine.com, my website’s WordPress dashboard and the public website, each in a separate tab. Explain what each page is for and how to recognize it. Ask me to sign in privately where needed; do not ask for passwords or verification codes. Do not assume I know how to find the dashboard or practice copy. Use the visible account pages to locate them, or guide me one step at a time. Confirm that the tabs belong to the same website before continuing.
Use Chrome to inspect the website and account pages I have made available. If you cannot identify my website, ask only for its address first. Find the technical details yourself wherever your access allows; do not ask me to collect version numbers, backup times or settings you can see. If I need to sign in, let me do it privately. Never ask me to paste passwords or customer information into this conversation. When you need my help, ask one simple question or give one clearly labeled click at a time, then wait for my response.
Before making changes, confirm which website is live and which is the practice copy, called staging. Check current and available WordPress, PHP, theme and plugin versions, the makers’ update instructions, which updates depend on others, license problems, custom changes, automatic-update schedules and the latest completed backup. Identify the important pages and customer actions to test. Ask me only about business priorities or details you cannot establish yourself; offer a sensible recommendation and explain why.
Give me a short, numbered update plan in the recommended order. For each item, explain what it does, why it needs attention, what must happen first, how you will check it and which saved backup we could use if needed. Keep the current and proposed version numbers in a compact reference list so I do not have to interpret them. Include any backup or automatic-update steps needed. Separate ready-to-do work from items needing help, and briefly note what is already up to date. Do not guess when access or compatibility is unclear. Finish with the next small step and a plain-language approval question. Wait for my approval before making changes, including creating a backup or changing update settings.
2. Rehearse on staging first
Use a current staging copy that represents the live site. Before copying anything, verify the source and destination with your host’s current instructions: copying in the wrong direction can overwrite good work. Protect staging from search indexing and unintended customer emails, live payments or automated integrations. Ask your developer to help with those controls if you are unsure.
Use test data and sandbox services. A staging site may look identical to production while behaving differently, so record any checks you cannot complete there. Keep PHP changes, major migrations and custom-code work in a separately reviewed plan.
3. Let compatibility decide the update order
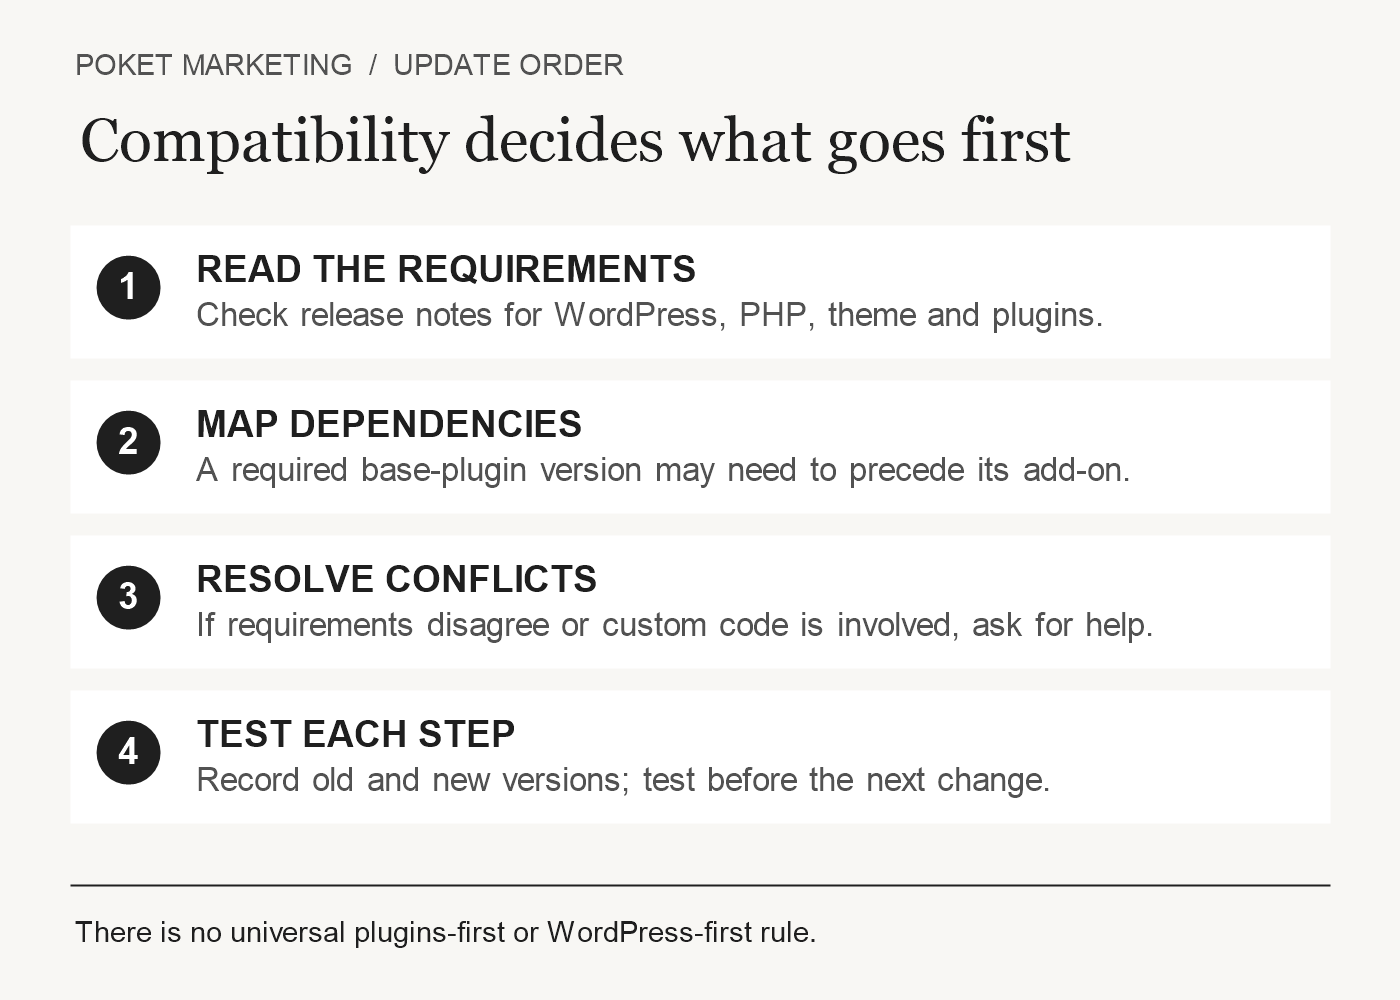
There is no reliable universal rule that says “always update plugins first” or “always update WordPress first.” The safe sequence depends on the versions your site uses and the requirements of the updates you want to install.
- Read the release notes and supported WordPress/PHP versions for each component.
- Check connected products together: a base plugin and its add-ons, or YOOtheme Pro and a third-party extension.
- If an add-on requires a newer base plugin, account for that dependency. Also check that the old add-on can tolerate the transition.
- If requirements conflict, the transition is unclear or custom integrations are involved, stop and ask the vendor or developer for a compatible path.
In WordPress, open Dashboard → Updates to review available updates. For a plugin, use its individual update link under Plugins → Installed Plugins; for a theme, review its update under Appearance → Themes. Coordinate WordPress core updates with your host’s current update policy.
On staging, apply one approved update, wait for completion, record the old and new versions, and test the affected functions before continuing. Avoid bulk updates during this supervised routine. A security fix deserves prompt attention, but it still needs a recovery plan.
A specific check for YOOtheme Pro
YOOtheme Pro uses the WordPress update system. Use Stable releases for production. Review the changelog and check third-party extensions before proceeding. See YOOtheme’s update guide.
Copyable AI prompt — guide me through the practice updates
Continue from the inspection and plan in this conversation. Guide me calmly in everyday language, explain unfamiliar terms and give brief, encouraging progress updates. Use the site addresses, versions, backup details and testing list you already found instead of asking me to enter them again. If the earlier plan is missing or out of date, inspect what you can and rebuild it; ask me only for information you cannot safely find yourself.
Work only on the confirmed staging site—the separate practice copy, not the website customers use. Explain the proposed sequence and ask for approval if I have not already approved that exact plan. Once approved, carry it out in the recommended order without asking me to manage each technical step. Check that the installed and proposed versions still match, verify a completed backup and record it, and confirm that tests cannot send unintended customer messages, trigger live integrations or take real payments. If a backup or setup change is needed outside the approved plan, explain it and obtain approval first.
Update one component at a time. After each update, record what changed and test the relevant pages, layouts, forms and customer actions before continuing. Tell me briefly what passed. Continue only when the required checks pass. Do the checks yourself wherever possible; if you need me to check my phone or confirm an email arrived, explain exactly what to do and what to look for, one step at a time. Distinguish checks you actually performed from anything you could not verify.
If a check fails or cannot be verified, or an unexpected change or unclear requirement appears, pause the sequence. Explain what happened without blame, what it means for me and the recommended next step. Do not add unplanned updates, change PHP, alter custom code, restore a backup or touch the live website. At the end, test the full customer journey and give me a simple summary of what worked, anything still needing attention and whether we are ready to discuss the live-site step.
4. Choose auto-updates deliberately
WordPress native auto-updates
WordPress offers individual plugin auto-update controls under Plugins and theme controls under Appearance → Themes. A host or plugin can change which controls are available. These switches automate installation; they do not replace your business-function test plan. Review notifications and maintain a usable recovery path. WordPress explains the controls here.
Our practical recommendation: consider native WordPress auto-updates for routine, well-supported components when you have monitoring and a clear owner. Review complex commerce, membership, custom integrations and major theme changes on staging first. Avoid overlapping update systems for the same component. If you leave an item on manual updates, schedule its review—“manual” should not mean “forgotten.”
Copyable AI prompt — help me choose automatic updates
Use what you have already learned about my website to help me choose which updates can happen automatically and which deserve a supervised check. Speak in everyday language, be patient and encouraging, and explain one decision at a time. Find the existing settings yourself using the access I have provided; do not ask me to gather technical details you can inspect. If you cannot identify the site or a setting, guide me to the right place with one clear instruction.
Review the current plugin and theme update settings without changing them. Explain which items WordPress updates automatically and which someone handles manually. Recommend one clear update method and responsible person or service for each item, taking account of how the parts work together and what customers use. Explain the tradeoff in terms of my business rather than jargon, and identify anything that should be tried on the practice copy first.
Use the backup and testing information already collected. Recommend who should receive update alerts and what to do if a check fails. Ask me only for choices you cannot make from the available information, such as who should receive those alerts, and offer a practical recommendation. End with a short proposed settings list, the reason for each choice and a clear approval question. Do not enable services, buy anything or change settings until I approve the specific changes.
5. Test what customers actually do
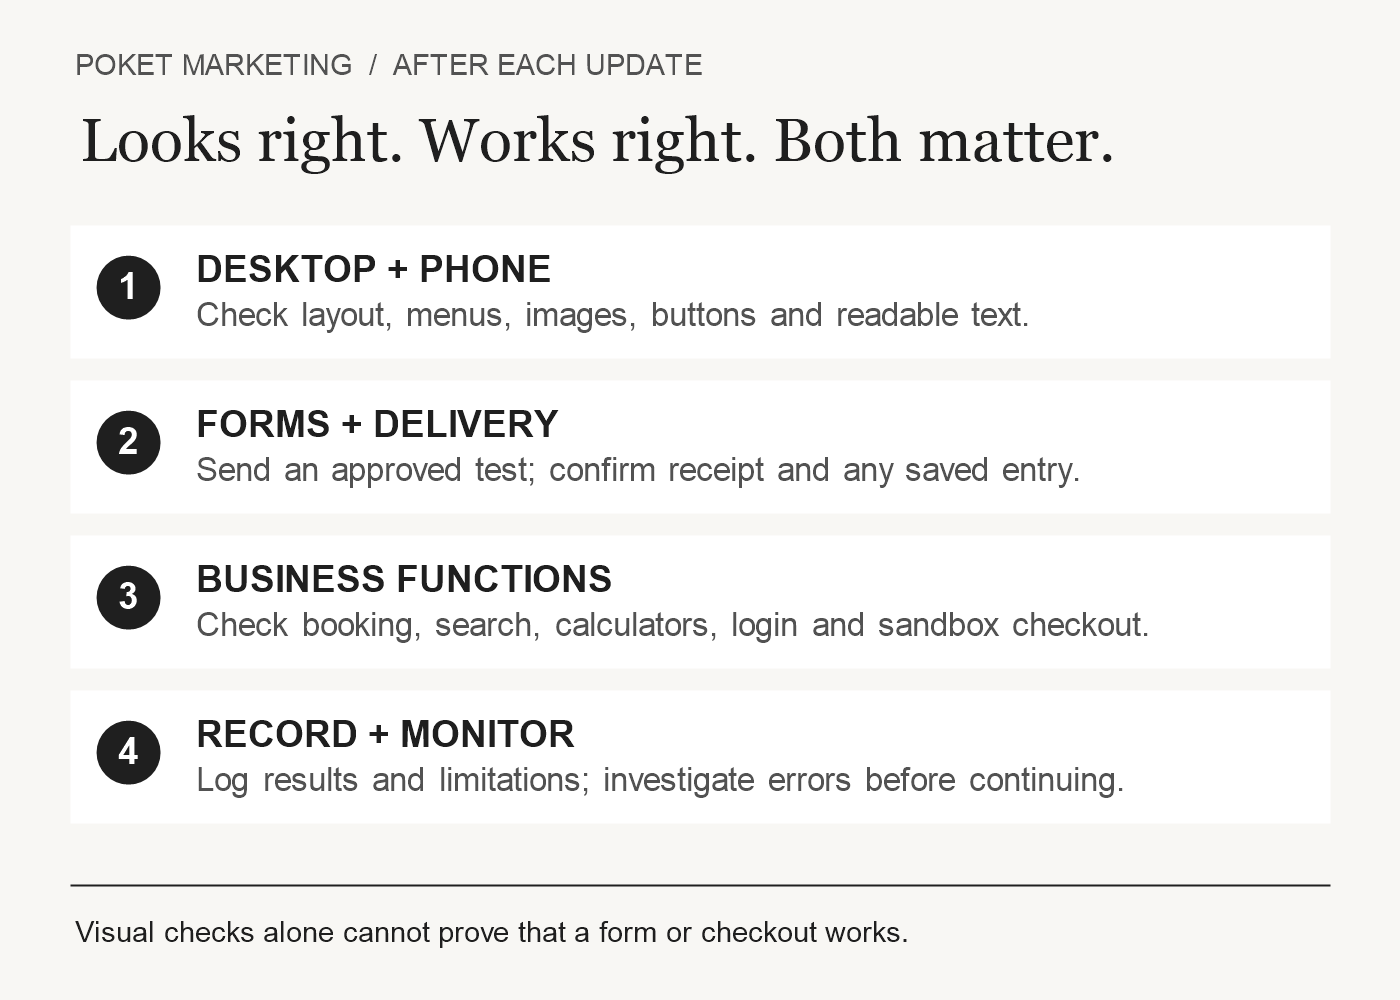
A success message tells you that an update ran. It does not tell you that a visitor can still contact you. Compare the same pages before and after, then complete the important journeys.
- Desktop and phone: homepage, key service pages, navigation, mobile menu, images, buttons and text. Look for overlaps, broken images and horizontal scrolling.
- Forms: use clearly labeled, approved test details; check validation, success message, actual email receipt and any stored entry or connected system. A visible “thank you” is only part of the test.
- Business functions: test relevant search, calculators, bookings, login/member access and sandbox checkout. Never create a real charge or customer notification just to see what happens.
- Fresh view: after appropriate cache clearing, check a logged-out browser as well as your administrator view. Record errors, failed checks and anything not tested.
Rather leave the live-site work to someone else? You can stop here and explore Poket Marketing’s website maintenance services. Getting help is a practical way to keep your website cared for while you focus on your business.
6. Repeat the approved changes on production
Once staging passes, approve the exact live sequence and a low-traffic window. Take a fresh completed production backup, then repeat the tested updates one at a time and run the same checks. Recheck vendor notes if the available version has changed since rehearsal.
Do not blindly push the staging database over production. New orders, inquiries, accounts and edits may have arrived while you were testing. A deployment involving database changes needs a plan that preserves that activity.
Copyable AI prompt — guide me through the live-site updates
Help me bring the successfully tested updates to the live website customers use. Continue from our approved plan and practice-site test results; gather the site address, versions, backup details and test list from your records and the account pages instead of asking me to type them. Explain everything in everyday language, give calm progress updates and ask only one simple question at a time when my input is needed.
First confirm that the practice-site checks passed and identify any checks that remain incomplete. If the records are missing or the website has changed, investigate and explain what needs to be checked again. Recommend a quiet time for the work and confirm it with me. Summarize the exact live-site changes in plain language and obtain my approval if that sequence and timing have not already been approved. Do not treat approval for practice-site work as approval to change the live site.
Before updating, verify a fresh completed live-site backup and record its time. If a new backup is needed, create it only when that step is approved and wait for it to finish. Apply the tested updates in order, one at a time, and check the affected pages and customer actions after every update. Continue only when the required checks pass. Handle the checks you can; if I need to check my phone or an email, give me one clear instruction and tell me what a successful result looks like.
Do not overwrite the live website’s stored information with the practice copy or make real payments as a test. If anything fails or cannot be verified, stop, explain the issue calmly and recommend the next step; do not restore automatically. Finish with a plain-language summary of completed updates, backup time, verified results and anything unresolved. Suggest the next maintenance date based on the site’s needs, and keep the technical version details in the maintenance record.
If something breaks, stop the sequence
Record the error, affected URL and last change. Do not pile on more updates. A restore can overwrite current content, including database records created after the checkpoint. Before restoring, identify new orders, submissions and edits and agree on how to preserve them. Ask WP Engine support or your developer for a recovery approach appropriate to the failure. After recovery, retest the site. Review WP Engine’s restore behavior.
Copyable AI prompt — help me when something goes wrong
Pause further changes and help me understand what went wrong. Be calm, patient and encouraging. Use everyday language, avoid blame and tell me what we know without pretending the problem is already fixed. Start with the failed checks, last changes and site details in this conversation. Inspect what you can without modifying the website. If you need me to describe something you cannot see, ask one simple question and help me find the answer.
Identify whether the problem affects the practice copy or the live site, what customers may notice and the most likely cause supported by the evidence. Find the relevant backup yourself and compare it with the current site. Before suggesting a restore, explain in simple terms what it would replace and whether newer orders, messages, accounts or edits could be lost. Do not expose customer records in your report or ask me to investigate technical details on my own.
Recommend the smallest sensible next step, explain why, and ask for approval of the specific recovery action. Do not restore, delete information, disable plugins or copy the practice site over the live site without that approval. If host or developer help is needed, prepare a short, plain-language message I can review and send, including the issue and checks already completed but no passwords or customer data. After any approved repair, repeat the relevant tests and clearly separate what is confirmed working from anything still uncertain.
Make the next maintenance session easier
Keep a short log: date, environment, backup checkpoint, old/new versions, test results, unresolved issues and who approved the work. Put the next review on your calendar and monitor update alerts between sessions. Use risk and vendor security notices to decide timing; a calendar reminder is not a reason to delay an urgent fix.
Want the website care without the DIY?
You can own your website without handling every update yourself. If you would rather spend your time running your business, explore Poket Marketing’s maintenance services. We can discuss your website, the support you need and a sensible next step.
Vendor guidance reviewed September 20, 2026. Menu labels, service availability and requirements can change; check the linked official instructions before working on your own site. The diagrams are process guides. The featured scene is AI-generated, with a supplied WP Engine dashboard screenshot adapted to the laptop display.